4.20.2013

Sea Inspired Wedding

The absolute most adorable couple 
met at the chapel this afternoon
and vowed to love each other forever...


and I was invited
to be apart of their
awesome celebrations!

The Cake

Fresh banana cake decorated in blue ombre buttercream, white buttercream coral, edible "sand" and white chocolate sea shells. My favorite accent to the cake are those adorable little "kissing" goldfish.


The Cupcakes
{Esty Shop where I bought cupcake wrappers}
Unbirthday Cake - Confetti cake topped with sour cream chocolate frosting and more sweet sprinkles!

Lemon Cream Pie - Vanilla bean cake filled with zesty lemon curd and topped with vanilla cream cheese frosting and lemon infused sugar.

Banana Pudding - Fresh banana cake topped with vanilla cream cheese frosting, toasted pecans and a caramel drizzle.
Savannah Belle - Southern red velvet cake topped with vanilla cream cheese frosting, a white chocolate sea shell and edible "sand."

The Favors

Sugar cookies adorned with two fondant goldfish {in love, of course} and white chocolate "bubbles." I finished them with a little disco dust for sparkle!


Ree and Lance were 
some of the sweetest clients 
and deserve nothing but the best!


I truely hope they enjoyed the cake
as much as I enjoyed creating it for them!
Super cute theme, huh!?

2.25.2013

Paper Airplane Birthday Party

My sweet baby 
{I mean, BIG boy}
turned 4 over the weekend!

And, boy did we celebrate!
Friends, family...and a yummy cake -
it just doesn't get much better than that! :)

My son has a thing for 
Paper Airplanes!
He loves them...

and every Sunday,
before church service,
my husband has to make him one!

So, I couldn't think
of a more fitting
big boy birthday theme!

It honestly doesn't get 
more budget friendly than
paper plane decor, either:

The Wreath
{painted initial with hot glued paper plane}


Happy Birthday Banner
{hand drawn letters and "zipping" planes on card stock}


Paper Airplane Banner
{hanging off the favor table, simply taped paper planes to twine - also had them hanging on the mantel and several other spots throughout the house}

Craft Table
{Paper plane centerpieces made with floral wire, a few cans, styrofoam and some fabric. I balled up coffee filters to cover foam - thought it looked like clouds. I also had a paper "table cloth" where I drew "zipping" planes and scattered mini paper planes like confetti.}

4 Year Photos + Mini Zipping Plane=
Cute Decor, for sure!

Add in some coordinating 
streamers and balloons...
and we were set!

Then there was the
FOOD:

Our "In-Flight" Dinner
{Included Baked Potato Soup, Cauliflower Clouds & Broccoli Tree Tops, Mile High Sammies, Mixed Nuts and a Pretzel Control Tower}


Dessert, of course!
{Cloud 9 Parfaits, Oreo Pops, Fruit Skewers and Marshmallow Treat Wings}


And, The Cake!
{Lemon Confetti Cake filled with Fresh Blueberry Preserves and topped with Marshmallow Buttercream. I finished it off with Buttercream "Zippy's," White Paper Planes and Lime Ribbon.}


Craft Time:
{making and decorating paper planes}

Then, each kiddo got to "Test Fly"
their plane through the hula hoop!
So.Much.Fun.

Baggage Claim Favor Table
{Included "candy clouds" - white cotton candy, paper plane making tools, stickers and aviator sunglasses. I put them in a simple white paper bag and drew the "zipping" plane on with a sharpie.}


The only thing I forgot to photograph were the invitations, but I simply printed the wording on the back of colorful scrapbook paper and folded it into a plane before placing in the envelope! Turned out adorable!

My sweet baby Mason James had an absolute ball!
And, that just makes my heart smile!
A perfect day it was, indeed!


12.13.2012

Pecan Praline Cake

Those of us who live here -
in the south, that is -
take our Pralines very serious!

Every candy store from
Virginia down to Georgia
have their version of this treat...

some are good ...
some are just okay ...
and some are ahhhmazing!

The rich, butter candy
{with sweet hints of vanilla and salt}
are paired beautifully with toasted pecans.

YUM!

So, naturally, I twisted this
regional delicacy
into a fabulous cake!

{ There's an extra "i" in there to stress the true pronunciation!! Tee hee! :) }


Ingredients
1 can Sweetened Condensed Milk
3/4 cup Butter, unsalted
1 tsp. Salt
1 tsp. Vanilla Extract

1 box Butter Cake Mix
1 cup Flour, all purpose
1 small box Vanilla Pudding Mix
4 Eggs, divided
1 cup Sour Cream
1 cup Pecans, chopped

1 stick Butter
1/2 cup Powder Sugar
2-4 tbsp. Milk {as needed}
Pinch of Salt
1 tsp. Vanilla Extract
1/4 cup Toasted Pecans {optional topping}

Method
In a small saucepan, combine first 4 ingredients. Cook over medium heat, stirring constantly, until mixture gets bubbly. Reduce heat to low and stir until it thickens and turns a shade or two darker. Set aside.
Preheat over to 325 degrees.
Whip egg whites until they are stiff. Place in fridge until needed.
In a kitchen mixer, fitted with a paddle attachment, stir cake mix {I like to use Duncan Hines, but your favorite will work just as well}, flour and pudding mix until incorporated. Add in egg yoke, sour cream, pecans and condensed milk mixture. Spoon out half of the egg whites and add to cake batter. With a rubber spatula, slowly fold in until incorporated. Add in the rest of the egg whites and fold in. {Your arm will be aching at the point, but it's SO worth it!}
Pour into a greased bundt or 9x13 rectangle cake pan and bake until a tooth pick comes out clean when inserted into the center of the cake, about 40 minutes. {May be a little longer for bundt pan or a little less for the rectangle pan - all depending on how your oven bakes.}
Invert cake onto plate and let cool completely before icing.

To make sauce, place butter into a small sauce pan and cook on medium heat for several minutes. You will notice the butter starting to brown - once you have reached a golden color with brown bits on the bottom of the pan, the butter is ready to remove from the heat. Add in salt and powder sugar and whisk until all lumps are gone. You will need to add in some milk to loosen the icing a bit - start with 2 tbsp. and add more {one tbsp. at the time} until you've reached a thick, but runny consistency. Add in your vanilla and pour over cooled cake.

This cake hits on
every flavor found in
Southern Pecan Pralines!


If you're in a hurry,
the cake can absolutely be served
as is with no sauce...

but, I am telling you
this sauce tops each slice off right
with it's awesome praline flavor!


Bake an extra one
and walk it over to the neighbor's -
what a thoughtful holiday gift!!

It will be their
{and YOUR}
best.day.ever!!


Enjoy and Happy Baking!


Oh yeah!! I partied this week ->
Check out my sidebar to find out where!

12.07.2012

Cinna-Bun Cookies

What are your
family's favorite recipe
for Santa Cookies?

There's Chocolate Chip...
Frosted Sugar...
maybe Gingerbread?

I've been trying 
a few NEW recipes
to really stop Santa in his tracks!!

I may have stumbled across a keeper:


Ingredients
{Recipe compiled from several recipes including Baker's Royale and Official Cinnabon Recipe}
Cookie:
2 cups Flour, all purpose
2 tsp. Ground Cinnamon
1 tsp. Salt
1/2 tsp. Baking Soda
1 stick Butter, softened
1/2 cup Brown Sugar
1 Egg, yoke only
1/4 cup Apple Butter
1 tsp. Vanilla Extract

Cinna-bon Smear:
{for inside of cookies}
3 tbsp. Butter, softened
1/2 cup Brown Sugar
1 1/4 tsp. Cinnamon
1/8 tsp. Salt

Cinna-bon Cream Cheese Frosting:
{to drizzle over cookies}
3 oz. Cream Cheese, cold
2 tbsp. Butter, softened
1/2 cup Powder Sugar
1 tsp. Vanilla Extract
1/8 tsp. Salt

Method
In a medium size bowl, combine flour, cinnamon, salt and baking powder. Set aside.
Cream butter and brown sugar together in a stand mixer fitted with a paddle attachment - add in egg yoke, apple butter and vanilla. Slowly mix in flour mixture until batter is completely combined. Divide batter in two balls and wrap each in plastic wrap or wax paper, rolling up to be as air tight as possible. Refrigerate for at least 30 minutes.

While the batter is chilling, preheat oven to 350 degrees and make cinnamon smear by combining all ingredients in a small bowl.

When batter has chilled, remove from plastic wrap and place on a floured cutting board. Roll out dough to 1/4 inch thickness and evenly spread smear from edge to edge of dough. Starting with one end, roll dough onto itself until a log is formed. {Repeat with second ball of dough.} Cut the very end of each log off, so that you will have an even starting point. Cut the logs in 1 inch pieces and place on a cookie sheet lined with parchment paper. Bake for 8-12 minutes. Cool completely before frosting cookies.

While the cookies are cooling, prepare frosting by creaming the cheese and butter together in a kitchen mixer fitted with a paddle attachment. Slowly add in powder sugar, vanilla and salt. Beat until frosting is fluffy and all powder sugar lumps are gone. Spread or pipe frosting onto cooled cookies and serve with ice cold milk!


These cookies are
soft, chewy and loaded 
with cinnamon bun flavor!

And, the creamy frosting
tops them off
perfectly ...


just as the greatest cinnamon bun should be!

Santa will be  pleasently surprised
with a plate of these
come Christmas Eve!

Enjoy and Happy Baking!


Oh, yeah! I partied this week! ->
Check out my sidebar to find out where! 

12.04.2012

Cookies and Cream Popcorn

How are your 
Christmas 
plans coming along?

This will be another year of
DIY Christmas Gifts
for my friends and family!

I like to do something
edible for all the
men in my life...

because,  to be completely honest,
that's about all I can come
up with for dude gifts! LOL!


Ingredients
{Recipe adapted from Cooking Classy}
2 bags Microwave Popcorn, salted only
26 Chocolate Sandwich Cookies, crushed
1 package White Chocolate Bark, melted
6 oz. Dark Chocolate, melted

Method
In a double broiler, melt the dark chocolate.
Melt bark in the microwave according to package directions. White chocolate can be very temperamental, so I would melt it in 20 second intervals and stir between each.
Place cookies in a food processor and pulse until they have become crushed. If you prefer a chunkier cookie in your mix, simply crush them with your fingers.
Place popcorn, one bag at the time, in microwave and cook according to package directions. I used a natural popping corn that had only been lightly salted. Once both bags have been popped, pour popcorn into a large bowl {making sure to remove all unpopped kernels} and stir in crushed cookies. Drizzle popcorn mixture with the melted white chocolate bark and stir to coat the entire batch.
Dump coated popcorn onto some wax paper and decorate with melted dark chocolate. Let all chocolate completely harden before placing in bowl, bag or jar. Makes approximately 16 cups and will keep for up to a week.

Helpful Hints:
  • You may want to consider using a store-bought popcorn - it seems to stay fresher and crisper longer. I would stick with a salted only flavor, though - Kettle Corn might be too sweet for some palates. I think this will be my best bet when giving it as a gift since I'm not really sure how quickly my recipient will eat their yummy treat!
  • I also think the best way to store/give this treat as a gift is in a glass jar. The popcorn didn't get soft as fast in the jar as opposed to being stored in a bag.
  • When making a second homemade batch, I poured the crushed cookies over the popcorn while it was still hot. That seemed to somewhat melt the vanilla filling, which I think only helps the white chocolate out in coating the popcorn! :) I will do it this way from now on when making a batch to be eaten the same day.

Oh, Smack-a-doodles!
This concotion is
dee-licious!

That salty crunch from the popcorn,
the sweet touch from bark and cookie
and an awesome bitter bite from the chocolate...


Your palate will 
tingle with excitement
from this combination - no doubt!

Everyone on your list
will L.O.V.E. finding gourmet
popcorn in their stocking!

Bag it up with a bow or
jar some up with a cutsie tag!
You can not go wrong!!


Better yet,
turn on "Elf" and eat
handfuls straight from the bowl!

Enjoy and Happy Baking!

Yeah, I partied this week ->
Check out where on my sidebar!

11.30.2012

Knock Off {Cranberry Bliss Bars}

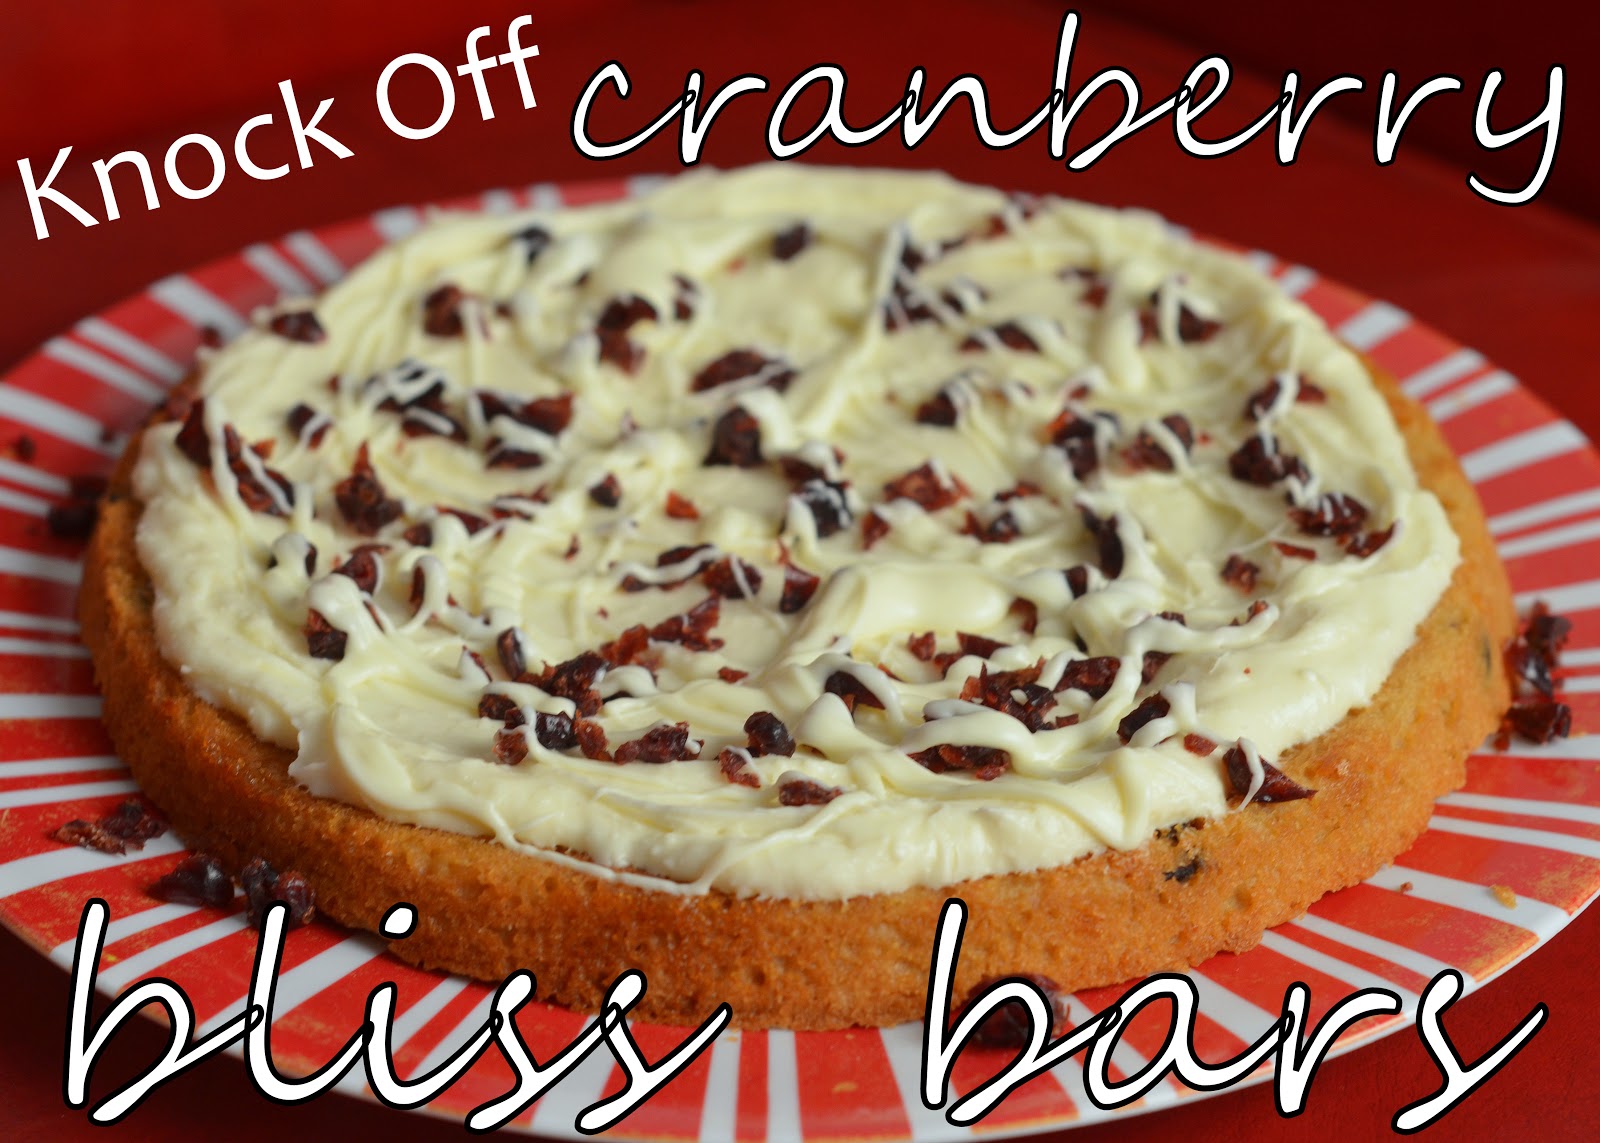
Cranberry Bliss Bars...
you know, the ones from Starbucks?
Totally awesome, right!?

Well, the other night
I was wasting time on Pintrest {again}
and came across a copy cat recipe for them!

I know what you're thinking -
"WHAAAAT!"
Yeah, that's what I said, too! ;)


Ingredients
{Recipe adapted from Averie Cooks}
1 stick Butter, melted
1 cup Brown Sugar 
1 Egg
Vanilla Beans, scraped from 1 pod
1 cup Flour, all purpose
1/2 tsp. Salt
1/2 cup Dried Cranberries, lightly chopped
1/2 cup White Chocolate Chunks {or chips}

Method
Preheat oven to 350 degrees.
Chop dried cranberries and set aside. If using a white chocolate bar rather than chips, chop into small chunks and set aside.
Grease a baking pan {I used a 9 inch round, but if you want smaller slices, an 8x8 inch square will be your best bet. If you want to double the recipe for a large batch, use a 9x13 inch rectangle pan.} and set aside.
In a medium size bowl, mix butter, brown sugar, egg and vanilla beans {1 1/2 tsp. of vanilla extract can also be used} with a wooden spoon. Add in flour and salt and stir just until the thick batter comes together. Next, stir in white chocolate and cranberries making sure not to over mix. Pour batter into your pan and bake for 18-20 minutes. Invert onto a pretty little plate and let cool completely before frosting the top. While the bars are cooling, prepare the 

White Chocolate Cream Cheese Frosting
4 oz. Cream Cheese
1 cup White Chocolate, melted in a double broiler
1 tsp. Vanilla Extract
1/2 cup Powder Sugar
1/4 cup Dried Cranberries, lightly chopped 

In a stand mixer fitted with the paddle attachment, mix cream cheese, 2/3 cup of the melted white chocolate and vanilla extract until combined. Slowly add powder sugar {note: you may need a little more or a little less sugar, depending on your frosting consistency preference}and beat on med-high for several minutes. 

When the bars have cooled, smooth the frosting on top with a spatula or knife. Sprinkle chopped cranberries on top and drizzle with remaining melted chocolate. Cut into slices or squares and serve! YUM! If you wish to slice in triangles like Starbucks, simply first cut into squares and then make a second cut across {from corner to corner} each square.

Whoa, momma!
These things are magical morsels
of pure happiness!


The bar is moist and chewy
with just the right amount of
sweet texture from the white chocolate.

But, you know what really put these over the edge?
The tart bite from those
dried cranberries!

Starbucks ain't got nothin'
on this recipe, baby dolls!


Not only would they look amazing
on a Christmas dessert table,
but your guests will also go ga-ga over the taste!

You could always bake up
a huge batch
for gift giving, too!

Or, keep the whole pan for yourself!
I think I'm indulging in another
blissful moment after dinner!

Enjoy and Happy Baking!

Yeah, I partied this week ->

Check out where on my sidebar!

11.29.2012

Spiced Pumpkin Bread

Well, hello there!
It's been a while...
I have A LOT of news!

Including a new addition
to our little, sweet family!
Meet my Alice:


We have had several months
to get adjusted to our new life...
and I am now ready to start baking again!

My amazing mother-in-law
gave me a huge jar of
fresh pumpkin over the weekend.

Hmm...what to do, what to do!?
{wink, wink}
I decided on perfecting the art of:


Recipe adapted from Cannella-Vita
Makes 2 loafs
Ingredients
2 sticks Butter, room temp.
3 cups Sugar
4 Eggs
15 oz. Pumpkin Puree {canned works perfect}
2/3 cup Buttermilk
1 tsp. Vanilla Extract
3 1/2 cups Flour, all purpose
2 tsp. Baking Soda
1 1/2 tsp. Salt
1 tsp. Ground Cinnamon
1 tsp. Ground Nutmeg
1/2 tsp. Ground Allspice
1/2 tsp. Ground Ginger {I adore ginger! If you don't, reduce to 1/4 tsp.}

Method
Preheat oven to 350 degrees.
In a bowl, mix flour, baking soda, salt and spices. Set aside.
Coat two loaf pans with a non-stick spray. Set aside.
In a stand mixer, with paddle attachment, mix butter and sugar together on medium speed. Once the mixture turns a light yellow in color, add in eggs - one at the time. Mix in pumpkin and vanilla extract. Alternating wet and dry, add in buttermilk and flour mixture {I do half the buttermilk, half flour mixture and repeat.} Scrap down sides of bowl and beat again on low for another few seconds, making sure all ingredients are nicely incorporated. Pour batter into prepared loaf pans and bake for 50-60 minutes. Be sure to test center of loafs with a tooth pick before removing from oven...tooth pick should come out clean after being inserted intoeach  loaf.

Now, cut you a thick slice
{while it's still warm, of course!}
and ENJOY!


This is my favorite 
pumpkin loaf recipe - by far!

The outside has a nice crunch
{similar to the top of a pound cake}
and the inside is uber moist and spicy!


This is the ultimate holiday bread!
Sprinkle with a little powder sugar
to add elegance for gift giving ...

Slather on a lil' {or a lot}
of vanilla cream cheese frosting
for a decadent twist ...

Use in other recipes like
Pumpkin Bread Pudding
or Pumpkin French Toast!


Whatever your use for it,
it will absolutely not disappoint!
Happy Baking, my friends!