Showing posts with label christmas 2010. Show all posts

12.23.2010

A Crafty Christmas #4

It's December 23rd and this will be my last post before Christmas. First of all...

MERRY CHRISTMAS!!!

I hope you and yours have a wonderful weekend full of laughter, joyment and remembrance...take this time to sslllooooowwww down, drink lots of hot chocolate, give multiple hugs and "i love you's" and relax with family and friends!
{Eat more than one cupcake, too!} ;)

Well, last night I finished up the final Christmas craft:
This gift is for my sister-in-law who is anxiously awaiting her second child {gender to be a surprise}, a caring full time nurse and super busy homemaker on her off time. So, what better gift to her than something that can organize her crazy schedule!


This magnetic board is covered in some fabulous fabric I found that is right up her ally...she loves red and the frame matches her home theme perfectly! I can not wait to see her reaction! Hopefully, it will get lots of use...from baby pictures to toddler drawings and a grocery list here and there, it should be a great way to display and organize!

Thanks for tuning in! Again, I wish you all a very Merry Christmas! See you in the New Year!


12.17.2010

A Crafty Christmas #2

You all have inspired me!!

I've seen homemade coasters on many DIY blogs and loved how easy {and inexpensive without looking cheap} they were to make! Here's how mine turned out:


I found white and beige tiles at Lowes for 36 cents a square! Whaa Hoo on that price! I had the paint and stencil from projects past.


After painting each tile, I sprayed the acrylic sealer in 3 coats {waiting an hour between each.} When the last coat had dried, I placed pads in each corner of the tile's underside and after a little fru-fru packaging, I was done!

Women stocking stuffers - CHECK!

I hope you're all having fun with your Christmas crafts! We're only 5 days away!! Yay!


12.15.2010

Mini Christmas Home Tour

My home is not even close to being finished. I'm sure most of you can sympathize with the fact I'm constantly changing, tweaking and adding to decor. :) Soooo, I'm going to share a few rooms that I'm happy enough with to post!

I don't know anyone who doesn't LOVE this time of year...I look forward to it starting in the summer. {Shhh, don't tell anyone, but I actually had all my Christmas decor up a week before Thanksgiving! That's how much I enjoy the feeling I get at the holidays! haha!}

We're starting in the dining room...and yes, I have a Christmas tree in the dining room! :) This
year's theme is "Partridge In A Pear Tree" - I hosted a Cookie Exchange a couple of weekends ago with that theme...I could kick myself for forgetting to take pictures! Ugh! Anyways, here we go!


This is my favorite room in the house....some of it is probably because I'm a chef and that's where my creations are enjoyed! But, it really is where my family spends most of their time - not to mention, that wall paper is to die for! Literally, I may love it more than I love my husband! ;) {Just kidding, honey!}

I know the table is a little on the skimpy side, but it is used several times a day so complicated centerpieces just doesn't make since for us. That's an old frame I found in the dump pile at a thrift store, so I gave the owner a quarter for it. I have another plan for it after the Christmas decor is put away!


Don't you love this window? My friend and fellow DIY'er gave it to me - it's from her parent's first house which was built by her grandfather. It's the best, right!?! I think I'm going to eventually hang it in our bedroom with an antique map behind it.

Now, we're moving into the living room...my second favorite room in the house! I just placed those shutters behind my hounds tooth chairs. What do you think? It's growing on me...I do think they need something, though, just not sure what that is...

Along with the shutters, this door was found in our attic. They are both solid wood and h.e.a.v.y!


This is my birdhouse wall...my husband and I almost divorced over those shelves! Haha - let's just say, we don't work that well together {when it comes to hanging shelves, anyway} - we both think we're right and have the best way of doing something! ;) No worries, we're still honeymoonin' it!


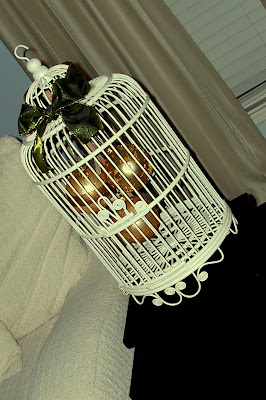
Check out this neat little area in the small hallway - it's a telephone station! I hated this so much when I first moved in! I just couldn't come up with a cool concept for it...I mean, I'm a baker at heart, ya know! But, then I found that odd little multi-vase thing at a flea market {it's held together by metal wire that's covered up by the Christmas bow.} Isn't it funny how one little $3 piece can get your creative juices flowing?

And, I'm leaving you with snippets of my kiddo's tree...the topper is a wooden train {"choo choo," as my son would say} tied with a bow.


Thank you so much for stopping by...
feel free to comment on any shutter suggestions! :) I need a creative boost for those! I hope you all are having a fun and festive Christmas season!

Jade C.

12.11.2010

"And there was a baby, lying in the manger..."

As far back as I can remember, my family has always had a manger scene displayed at Christmas. It was one of the many ways we remembered what December 25th really represented...the memory of our Savior's birth.

My childhood manger was unlike the one's found in department stores, though. No gold or emeralds or sparkles could be found on it- just a little wood and pine straw made by my dad's hands. It certainly was not beautiful in the traditional meaning, but it was perfect none the less.


When my husband and I bought our house {oddly enough at Christmas time} I searched for a manger to continue the tradition. But, I just couldn't find one that I felt stayed true to the one a baby was born in so many years ago. Completely bummed, I gave up on the purchase and decided to wait until the following year to make one.

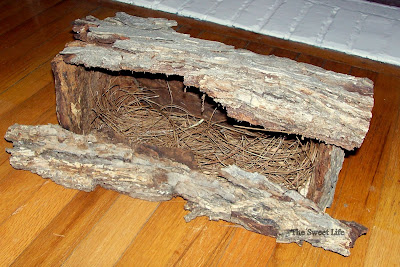
Then, I was surprised by my father Christmas day...I remember him handing me a large cardboard box with the top flaps open and tissue paper sticking out. Inside sat a manger, just like the one sitting on his mantel! Although I was not apart of this particular craft, I feel like I just have to share how easy it really is to make! You won't believe it!


My dad used a scrap piece of wood he had on hand. Placing it flat on a work table, he used a little wood glue to adhere the bark along each edge, omitting what will be the front. After placing the sides, he finished by gluing the top piece to the manger's "walls." All that was left to do from there was lay down the pine straw/moss inside the manger {to make the "floor"} and place my figurines.

We did decide to add another piece of bark across the bottom to cover the front edge and really give it a finished look. Literally, in matter of minutes you can have a manger sitting in front of you!


This is one of the best presents I've ever received and I'm so excited I get to share this tradition with my son for years to come...perhaps even make one for his own home one day. {many, many years from now!!} ;)


Wishing you a Merry Christmas!


Jade

Blogs I've Linked Up To:

Craft-O-Maniac

C.R.A.F.T.

Tracy's Trinkets and Treasures

Not JUST A Housewife

No Minimalist Here

Someday Crafts

The Shabby Nest